Struggling with a garden that just won’t thrive? If your plants seem stunted and your soil feels like a brick, you might be dealing with compacted clay soil.
Don’t worry—you’re not alone. Many gardeners face this challenge, but there’s a simple solution: aerating the soil. The best part? You don’t need expensive machinery to get started. Just a few hand tools can make a world of difference. Imagine your plants growing lush and healthy, thriving in well-aerated soil.
Intrigued? Keep reading to discover how you can transform your garden with just a bit of effort and the right techniques. Your plants will thank you!

Credit: uk.style.yahoo.com
Why Clay Soil Needs Aeration
Clay soil is dense and holds water tightly. This makes it hard for air to reach plant roots.
Aeration loosens the soil, helping roots get oxygen and grow healthy. This is why clay soil needs aeration.
Challenges Of Clay Soil
Clay soil has many problems that make gardening hard. It is heavy and stays wet too long.
- Water drains slowly, causing root rot
- Soil becomes compacted and hard to dig
- Poor air flow limits root growth
- Plants may struggle to get nutrients
- Surface cracks when dry, harming roots
Benefits Of Aeration
Aerating clay soil improves its structure and health. It allows water and air to move better.
| Benefit | Explanation |
| Improved Drainage | Water flows through soil, reducing puddles |
| Better Air Flow | Roots get oxygen for growth |
| Reduced Compaction | Soil becomes looser and easier to work |
| Healthier Plants | Roots absorb nutrients better |
| Less Surface Cracking | Soil stays stable during dry spells |

Credit: uk.style.yahoo.com
Choosing The Right Hand Tools
Aerating clay soil helps water and air reach plant roots. Using hand tools is a simple way to do this in small areas.
Picking the right tool makes aeration easier and more effective. The right tool depends on your soil and garden size.
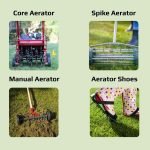
Types Of Aeration Tools
There are several hand tools for aerating clay soil. Each tool works in a different way to loosen the soil.
- Garden Fork:A simple fork with sharp tines. Push it into the soil and wiggle to create holes.
- Aeration Shoes:Spiked shoes that you strap on. Walk on your lawn to poke holes in the soil.
- Handheld Spike Aerator:A small tool with spikes. Press it down to pierce the soil in small spots.
- Plug Aerator:Removes small plugs of soil. Helps reduce compaction but is harder to use by hand.
Tool Selection Tips
Choose a tool based on your soil type and garden size. Clay soil is dense, so tools that penetrate deeply work best.
Consider your physical strength too. Some tools need more effort. Pick one you can use comfortably and safely.
- Garden forks are good for small gardens and flower beds.
- Aeration shoes work well on lawns but need balance.
- Handheld spike aerators are easy to use in tight spaces.
- Plug aerators work best for larger lawns but may need more strength.
- Look for sturdy handles and sharp tines for better soil penetration.
Preparing The Soil
Aerating clay soil helps plants grow better. Preparing the soil properly makes aeration easier and more effective.
Start by getting the soil ready. This includes clearing debris and checking moisture levels.
Clearing Debris
Remove leaves, sticks, and stones from the soil surface. Debris can block tools and stop air from reaching the soil.
Clearing debris helps the soil absorb water and nutrients better after aeration.
- Use a rake or your hands to pick up debris
- Clear a wide area where you plan to aerate
- Dispose of debris away from the garden
Moisture Check
Check if the clay soil is moist but not too wet. Wet soil is hard to work with and can get damaged.
Soil that is too dry will be tough to aerate and may crack during the process.
- Push a screwdriver or garden fork into the soil to test moisture
- Soil should feel damp and soft, not muddy or dry
- Water the soil a day before aerating if it is too dry
Step-by-step Aeration Process
Aerating clay soil helps water and air reach plant roots. This makes plants grow better. Using hand tools is a simple way to do this.
Follow these steps to aerate your clay soil with hand tools. It will improve soil health and plant growth.
Marking The Area
Start by marking the area you want to aerate. This helps you cover the entire space evenly. Use stakes or string to mark the edges.
Clear the area of debris and weeds. This makes it easier to work and prevents tool damage.
Using A Garden Fork
A garden fork is a great tool for loosening clay soil. Push the fork into the soil about 6 to 8 inches deep. Wiggle it slightly to open the soil.
Work across the marked area in rows. Leave a few inches between each fork insertion to cover all parts.
- Insert fork vertically
- Push down 6-8 inches
- Wiggle to loosen soil
- Move 6-8 inches apart
Employing A Hand Tiller
A hand tiller can break up hard clay soil efficiently. Hold the tiller and press the tines into the ground. Move it back and forth to stir the soil.
Cover the whole area by working in sections. This helps the soil get more air and water.
- Press tiller tines into soil
- Move tiller back and forth
- Work in small sections
- Ensure even coverage
Creating Aeration Holes
Making holes in the soil helps air, water, and nutrients reach roots. Use a tool like a soil probe or a sturdy rod for this.
Push the tool into the soil about 6 inches deep. Pull it out to leave a hole. Space the holes about 4 to 6 inches apart for best results.
- Use soil probe or rod
- Push 6 inches deep
- Pull out to create hole
- Space holes 4-6 inches apart
After Aeration Care
Aerating clay soil helps improve water and air flow to plant roots. After aeration, proper care keeps your soil healthy and plants strong.
Follow these tips to maintain good soil structure and promote growth after aerating clay soil with hand tools.
Adding Organic Matter
Adding organic matter helps break up heavy clay and adds nutrients. It improves soil texture and encourages beneficial microbes.
- Spread compost evenly over the aerated soil.
- Use well-rotted manure or leaf mold as alternatives.
- Mix organic matter gently into the soil with a rake or fork.
- Avoid compacting the soil after adding materials.
Watering Tips
Water the soil carefully after aeration to help organic matter settle and roots absorb moisture. Avoid overwatering to prevent puddles.
| Time After Aeration | Watering Advice |
|---|---|
| First 24 hours | Light watering to moisten soil without flooding |
| Next 1–2 weeks | Deep watering every 3–4 days to encourage root growth |
| After 2 weeks | Water as needed based on weather and soil dryness |
Mulching Benefits
Mulching protects aerated soil from drying out and reduces weed growth. It also adds organic matter slowly as it breaks down.
- Use natural mulches like straw, wood chips, or shredded leaves.
- Apply a 2 to 3-inch layer over the soil surface.
- Keep mulch a few inches away from plant stems to prevent rot.
- Replenish mulch as it decomposes to maintain coverage.
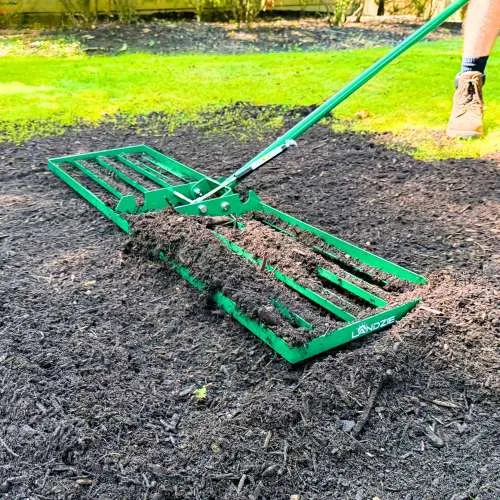
Credit: landzie.com
Maintaining Aerated Clay Soil
Aerating clay soil helps plants get air, water, and nutrients. Proper care keeps the soil loose and healthy.
Using hand tools for aeration is simple and effective. Regular attention prevents soil problems.
Regular Aeration Schedule
Clay soil needs aeration at least twice a year. Early spring and early fall are the best times.
- Aerate in early spring before plants grow.
- Repeat aeration in early fall after harvest.
- Check soil moisture before aerating; it should be damp, not wet.
- Use a hand fork or aerator tool to poke holes 4-6 inches deep.
- Remove plugs or loosened soil to improve air flow.
Avoiding Soil Compaction
Soil compaction blocks air and water from reaching roots. Avoid heavy tools or walking on wet soil.
| Cause | Effect | Prevention |
| Heavy foot traffic | Soil gets dense | Use walkways or mulch |
| Overuse of heavy tools | Crushed soil structure | Choose light hand tools |
| Working soil when wet | Clumps and compacts | Wait for soil to dry slightly |
Frequently Asked Questions
What Is The Best Hand Tool To Aerate Clay Soil?
The best hand tools for aerating clay soil are garden forks and hand aerators. They create holes that improve air and water flow. These tools break compacted soil without damaging roots. They are easy to use and effective for small garden areas.
How Often Should I Aerate Clay Soil By Hand?
Aerate clay soil by hand once or twice a year, preferably in spring or fall. This timing helps improve soil structure before planting seasons. Regular aeration prevents compaction and promotes healthy root growth. Avoid aerating when soil is too wet or dry.
Can Hand Tools Improve Drainage In Clay Soil?
Yes, hand tools like forks and aerators improve drainage by loosening dense clay soil. They create small holes that allow water to penetrate and drain better. This reduces waterlogging and root rot risks. Improved drainage supports healthier plants and soil microbes.
Is Hand Aeration Effective For Large Clay Soil Areas?
Hand aeration is best suited for small to medium garden spaces. For large clay soil areas, mechanical aerators save time and effort. However, hand tools provide precise control and are affordable. They remain effective for spot treatments and tight spaces.
Conclusion
Aerating clay soil with hand tools helps plants grow better. It lets air, water, and nutrients reach roots easily. Use simple tools like a garden fork or a hand aerator. Work slowly and cover the whole area evenly. Regular aeration keeps soil healthy and strong.
Your garden will thank you with greener, happier plants. Try this easy method and see the difference yourself. Taking care of soil is key to a thriving garden. Simple steps make big changes. Start today for better soil and better plants.