If you’re working on a construction project, knowing how to read a construction level is a skill you can’t afford to miss. This simple tool helps you make sure your surfaces are perfectly flat or your structures are aligned just right.
But if you’ve never used one before, it might seem confusing or tricky. Don’t worry—by the end of this article, you’ll understand exactly how to read a construction level with confidence. Keep reading, and you’ll avoid costly mistakes and build with precision every time.
Credit: www.vectorsolutions.com
Types Of Construction Levels
Construction levels help builders measure flatness and height. They are tools to check if surfaces are even or slopes are correct.
Different types of levels work in various ways. Choosing the right one depends on the task and accuracy needed.
Bubble Levels
Bubble levels are simple tools with a liquid-filled tube. A bubble inside the tube shows if a surface is level.
They come in different sizes and shapes. Builders hold them on surfaces to check flatness or straightness.
- Easy to use and affordable
- Good for small jobs and quick checks
- Works well indoors and outdoors
Laser Levels
Laser levels send out a laser beam to create a straight line. This line helps measure level or plumb over long distances.
They are useful for large projects like walls, ceilings, and floors. Some models rotate to cover wide areas quickly.
- High accuracy for long distances
- Works well in bright or dark places
- Can be set up on tripods for hands-free use
Digital Levels
Digital levels use electronic sensors to measure angles and slopes. They show readings on a screen for easy reading.
These levels give precise numbers and can save measurements. They are good for projects needing exact data.
- Displays exact angle or slope measurements
- Easy to read digital screen
- Some models store data for later use

Credit: www.walmart.com
Key Components Of A Level
A construction level is a tool used to check if surfaces are flat or straight. It helps builders measure angles and heights accurately.
Understanding the key parts of a level makes it easier to use. Each component has a specific function for measuring and aligning.
Vials And Bubbles
Vials are small tubes filled with liquid and a bubble. They show if a surface is level or plumb.
The bubble moves inside the vial. When it is centered between two marks, the surface is even.
- Horizontal vials check flat surfaces
- Vertical vials check upright surfaces
- Some levels have angled vials for specific slopes
Base And Frame
The base is the bottom part of the level. It rests on the surface you want to measure.
The frame holds all parts together. It is usually made of metal or durable plastic for strength.
- Flat base for stable contact
- Strong frame resists bending
- Some frames have handles for easy grip
Laser Emitters
Laser emitters send a straight light beam to measure level or alignment over long distances.
The laser helps when checking large areas where vials alone are not enough.
- Projects horizontal or vertical laser lines
- Improves accuracy on big projects
- Often powered by batteries
Preparing The Level For Use
Using a construction level correctly starts with proper preparation. This ensures accurate readings and safety on the job site.
Before you begin, take time to check and set up the level properly. This section guides you through key steps to prepare your tool.
Calibrating The Device
Calibration keeps the level accurate. Place the device on a flat surface and adjust the bubble until it is centered. Repeat this process on different surfaces to confirm reliability.
Checking For Damage
- Inspect the level for cracks or dents on the body.
- Check the vial for any bubbles or leaks.
- Ensure the mounting screws are tight and secure.
- Test the leveling mechanism to see if it moves smoothly.
Setting Up On A Stable Surface
| Surface Type | Stability Level | Notes |
|---|---|---|
| Concrete Floor | High | Ideal for precise leveling |
| Wooden Planks | Medium | Check for warping or gaps |
| Gravel or Dirt | Low | Use a board to stabilize the level |
Reading Bubble Levels Accurately
Using a bubble level helps check if surfaces are flat or straight. Reading it right is key for good results.
This guide explains how to read bubble levels carefully to avoid mistakes and get precise measurements.
Aligning The Bubble
Place the level on the surface you want to check. Look at the bubble inside the vial carefully.
The bubble should sit between the two marked lines. If it is centered, the surface is level.
Adjusting The Angle
If the bubble is off-center, change the surface angle slowly. Watch the bubble move as you adjust.
Stop adjusting when the bubble rests exactly between the lines. This shows the surface is even.
Common Mistakes To Avoid
Do not tilt your head or the level when reading the bubble. This can cause wrong readings.
Make sure the level is clean. Dirt or damage can stop the bubble from moving freely.
- Reading the bubble at an angle instead of straight on
- Using a damaged or dirty level
- Placing the level on an uneven or unstable surface
- Ignoring temperature effects on the liquid inside the vial
Using Laser Levels Effectively
Laser levels help you get accurate measurements on construction sites. They project a straight line that guides your work. Using them correctly saves time and avoids mistakes.
This guide covers how to set the laser line, read the projections, and keep the line visible in bright light. Follow these tips for better results.
Setting The Laser Line
Place the laser level on a stable surface or tripod. Make sure it is roughly level before turning it on. Use the built-in bubble vial or automatic leveling feature if available.
- Check the battery before use
- Secure the level to avoid movement
- Adjust the height for your working area
- Turn on the laser and wait for it to stabilize
Interpreting Laser Projections
The laser projects a line or dot on surfaces. Use this as a reference for height or alignment. Make sure the line matches your project’s measurements.
| Projection Type | Use | Tip |
| Horizontal Line | Level floors and ceilings | Check line at multiple points |
| Vertical Line | Align walls and posts | Keep line steady for accuracy |
| Cross Line | Layout corners and intersections | Verify both lines meet at right angles |
Maintaining Visibility In Bright Conditions
Bright sunlight can make laser lines hard to see. Use these tips to improve visibility and reduce eye strain.
- Wear laser-enhancing glasses
- Use laser detectors or receivers
- Shade the laser line with a board or umbrella
- Work during early morning or late afternoon when light is softer
Tips For Ensuring Level Accuracy
Reading a construction level accurately is key for a precise build. Small errors can cause big problems later.
This guide shares tips to keep your level readings reliable on every project.
Regular Calibration
Calibration keeps your construction level accurate over time. Check it before each use.
- Set the level on a flat surface and note the bubble position.
- Rotate the level 180 degrees and check the bubble again.
- If the bubble is off, adjust the level or have it serviced.
- Repeat this process monthly or after heavy use.
Proper Handling And Storage
Handle your level carefully to avoid damage. Store it in a dry, safe place.
| Handling Tips | Storage Tips |
|---|---|
| Carry with both hands | Keep away from direct sunlight |
| Avoid dropping or bumping | Store in a padded case |
| Clean after use | Keep away from moisture |
| Check for cracks or leaks | Store horizontally to prevent warping |
Cross-checking Measurements
Always double-check your readings by measuring from different points.
- Use a tape measure to confirm distances.
- Check slopes or angles with a secondary level.
- Compare readings with previous measurements.
- Ask a colleague to verify your setup.
Troubleshooting Common Issues
Reading a construction level correctly is important for accurate work. Sometimes, the device shows wrong readings. These errors can cause mistakes in your project.
Knowing how to fix common problems helps you avoid delays. Below are some common issues and tips to solve them.
Inconsistent Bubble Readings
The bubble in the level may not stay in one place. This makes it hard to get a correct reading. The surface might not be flat or the device may be dirty.
Check if the level is clean and dry. Make sure you place it on a smooth, flat surface. Avoid using the level on uneven or soft materials.
- Clean the vial with a soft cloth
- Use the level on a hard, flat surface
- Check if the bubble moves freely inside the vial
- Replace the vial if it is cracked or damaged
Laser Misalignment
A laser level may show wrong lines if it is not aligned correctly. The laser beam can shift after being dropped or bumped. This causes inaccurate level readings.
Always set the laser on a stable surface. Use the device’s built-in calibration tools to check alignment. If the laser is off, adjust it according to the manual.
- Place the laser on a flat, steady surface
- Use calibration mode to check laser position
- Adjust screws or knobs to realign the laser
- Contact a professional if calibration fails
Device Malfunctions
Sometimes the construction level stops working properly. Batteries may die or internal parts can break. This leads to wrong or no readings.
Regularly check batteries and replace them if needed. Keep the device clean and handle it carefully. If it still malfunctions, repair or replace the tool.
- Replace old or weak batteries
- Keep the device free from dust and dirt
- Avoid dropping or rough handling
- Get professional repair for internal problems
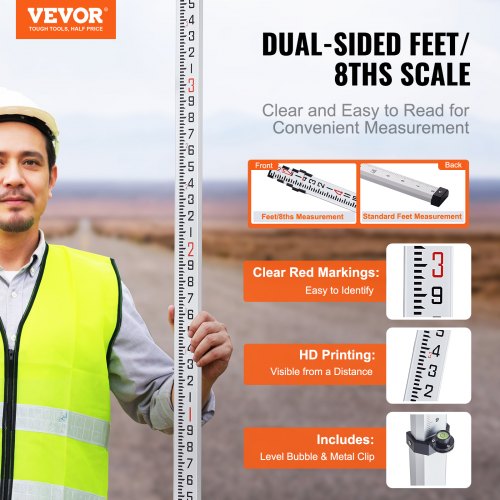
Credit: www.vevor.ca
Frequently Asked Questions
What Is A Construction Level Used For?
A construction level measures height differences and ensures accurate leveling on job sites. It helps create level surfaces for foundations and structures.
How Do You Read The Bubble On A Construction Level?
Center the bubble between the two marked lines. When the bubble is perfectly centered, the surface is level.
Can Beginners Easily Use A Construction Level?
Yes, beginners can use a construction level with basic practice. Understanding bubble positioning and reading measurements is key.
Why Is Reading A Construction Level Important?
Accurate reading prevents structural issues by ensuring surfaces are level. This improves safety and quality in construction projects.
Conclusion
Mastering the construction level takes practice and patience. Start with basics. Understand its parts. Practice reading the bubble. Use it on different surfaces. This helps with accuracy. Remember to keep the level clean. Dust and dirt can affect readings. Always handle with care.
A well-maintained tool lasts longer. Keep practicing and your skills will improve. Consistent use builds confidence. Soon, reading a construction level becomes second nature. You’ll find tasks easier. Precision in measurement leads to better results. Enjoy your projects and the satisfaction of a job well done.