Are you tired of guessing measurements and ending up with crooked cuts or uneven edges? Using a ruler correctly can make all the difference in getting precise, reliable results every time.
Whether you’re working on a DIY project, school assignment, or craft, knowing how to use a ruler for accurate measurements is a skill that saves time and frustration. You’ll discover simple tips and tricks that will help you measure like a pro, so your work looks neat and professional.
Keep reading, and you’ll never second-guess your measurements again!
:strip_icc():format(webp)/kly-media-production/medias/5308057/original/008135500_1754534563-markus-spiske-pwpVGQ-A5qI-unsplash.jpg)
Credit: en.liputan6.com
Choosing The Right Ruler
Using a ruler correctly starts with picking the right one. The right ruler helps you get exact measurements for your project.
Rulers come in different types and materials. Choosing the right type makes your work easier and more accurate.
Materials And Durability
Rulers are made from wood, plastic, metal, or other materials. Each material affects how long the ruler lasts and how well it works.
Wood rulers are light and affordable but can wear down or break easily. Plastic rulers are flexible and often clear. Metal rulers are strong and last longer but can be heavier.
- Wood: Lightweight, can chip or warp
- Plastic: Flexible, often transparent
- Metal: Durable, heavy, precise edges
Measurement Units
Rulers use different units like inches, centimeters, or both. Pick a ruler that matches the units you need to measure.
Some rulers show only one unit. Others have both metric and imperial units on each side. This helps measure in different systems easily.
- Inches: Used mainly in the US
- Centimeters: Used worldwide with metric system
- Dual scale: Both units on one ruler
Specialized Rulers
Some rulers are made for special tasks. These rulers help with specific jobs like drawing curves or measuring angles.
Examples include flexible rulers for curves, architect rulers with scales, and protractors for angles. Choose a specialized ruler if your project needs it.
- Flexible rulers: Bend to measure curved lines
- Architect rulers: Multiple scales for drawings
- Protractors: Measure angles accurately
Preparing For Measurement
Using a ruler correctly starts before you measure. Preparing your space and object helps get right results.
Careful setup reduces errors and makes measuring simple and clear.
Surface And Lighting
Choose a flat, stable surface to place your object and ruler. Good lighting lets you see the ruler marks clearly.
- Use a table or desk with no wobble
- Pick a bright spot or use a lamp
- Avoid shadows on the ruler and object
- Keep the surface clean and free of clutter
Positioning The Object
Place the object so it lies flat on the surface. Align it with the ruler’s zero mark for accurate starting points.
| Position | Reason |
| Flat and stable | Prevents movement while measuring |
| Aligned to zero mark | Ensures correct measurement from start |
| Clear of shadows | Improves visibility of edges |
Ensuring Stability
Keep both the object and ruler steady. Use your non-dominant hand to hold the ruler in place.
- Place ruler flat against the object
- Hold ruler firmly but gently
- Do not move the object during measurement
- Use tape if needed to secure the object
Aligning The Ruler Properly
Using a ruler correctly helps you get exact measurements. Aligning the ruler well is important to avoid mistakes.
This guide shows simple tips to place your ruler right for the best results.
Starting From Zero
Always start measuring from the zero mark on the ruler. Some rulers have extra space before zero. If you start from the edge instead, your measurement will be off.
- Look for the zero mark on the ruler.
- Place the zero exactly at the beginning of the object.
- Do not guess or start from the ruler’s edge if zero is inside.
Avoiding Parallax Errors
Parallax error happens when you look at the ruler from an angle. This causes wrong reading of the measurement.
| View Angle | Effect on Measurement |
|---|---|
| Looking straight down | Correct reading |
| Looking from left or right side | Measurement appears longer or shorter |
| Looking from above or below | Numbers may be blurred or misread |
Always place your eyes directly above the measurement mark. This stops parallax errors and gives true results.
Using Edge For Precision
The ruler’s edge helps align it exactly with the object. Using the edge ensures your measurement starts and ends correctly.
- Place the edge of the ruler flush against the object.
- Hold the ruler firmly so it does not move.
- Check that the object’s end matches the measurement mark.
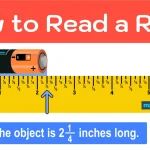
Reading Measurements Accurately
Using a ruler correctly ensures your measurements are exact. Small mistakes can cause big problems in projects.
This guide explains how to read ruler markings, estimate between lines, and use fractional units.
Interpreting Markings
Rulers have many lines that show different units. The longest lines usually mean whole numbers like inches or centimeters.
Shorter lines represent smaller parts. It is important to know which lines mean what to avoid confusion.
- Longest lines mark whole units.
- Medium lines show half or quarter units.
- Shortest lines represent smaller fractions like eighths or sixteenths.
Estimating Between Lines
Sometimes the object falls between two lines. You need to guess the measurement by estimating the space.
Look carefully at the distance between the two closest lines. Divide this space mentally to find a closer estimate.
| Between Lines | Estimate |
| Halfway | 0.5 unit |
| One quarter | 0.25 unit |
| Three quarters | 0.75 unit |
Using Fractional Units
Rulers often use fractions to show parts of an inch or centimeter. Understanding these fractions improves accuracy.
- 1/2 means half a unit.
- 1/4 means one quarter of a unit.
- 1/8 means one eighth of a unit.
- 1/16 means one sixteenth of a unit.
Common Measurement Mistakes
Using a ruler seems simple, but many make errors that affect accuracy. These mistakes can cause wrong measurements and wasted materials.
Understanding common mistakes helps you measure better. Avoid these errors to get exact results every time.
Misaligned Starting Point
Many people start measuring from the ruler’s edge instead of the zero mark. The edge can be worn or uneven, causing wrong lengths.
Always align your object’s start with the zero line on the ruler. This ensures you measure the full length accurately.
Ignoring Ruler Thickness
A ruler’s thickness can add or subtract from your measurement. If you place the ruler above or below the object, the thickness shifts your reading.
Keep the ruler flat and flush against the object. This avoids mistakes caused by the ruler’s width or thickness.
Incorrect Unit Conversion
Switching between inches and centimeters often causes errors. People forget to convert units properly or mix them up.
Double-check which unit your ruler uses. Use a calculator or conversion chart if you need to change units.
- 1 inch = 2.54 centimeters
- 1 foot = 12 inches
- 100 centimeters = 1 meter

Credit: apps.apple.com
Advanced Techniques
Using a ruler for simple straight measurements is easy. Some projects need more advanced methods to get exact results.
These techniques help you measure curved surfaces, use other tools with rulers, and connect with digital devices.
Measuring Curved Surfaces
Rulers work best on flat surfaces, but curves need special care. Use a flexible measuring tape or a strip of paper to trace curves first.
- Place a thin strip of paper along the curve
- Mark the start and end points on the paper
- Lay the paper flat and measure with the ruler
- Note the measurement for your project
Using Calipers With Rulers
Calipers help measure inside and outside distances with high accuracy. Combine calipers with rulers for better results.
| Tool | Purpose | How to Use with Ruler |
| Caliper | Measure thickness or gap | Use jaws to hold object, then compare scale to ruler |
| Ruler | Measure length | Measure caliper scale or object edges for reference |
Digital Ruler Integration
Digital rulers connect to devices to record measurements quickly. Use apps to save and analyze data.
- Calibrate the ruler before starting
- Keep the ruler steady during measurement
- Sync data to your device regularly
- Use app features to note multiple measurements
Maintaining And Storing Your Ruler
Using a ruler for accurate measurements means keeping it in good shape. Proper care helps the ruler last longer and stay precise.
This guide shows easy ways to clean, protect, and store your ruler safely.
Cleaning Tips
Keep your ruler clean to read measurements clearly. Dirt and marks can hide the lines and numbers.
Use a soft cloth with mild soap and water. Avoid harsh chemicals that can damage the surface.
- Wipe gently with a damp cloth
- Dry with a soft towel to avoid water spots
- Remove sticky residue with rubbing alcohol carefully
Avoiding Warping
Keep your ruler flat to keep measurements accurate. Warping makes the ruler bend and changes its length.
Do not leave your ruler in hot places or under heavy objects. Heat and pressure cause it to bend or twist.
- Do not place the ruler near heaters or direct sunlight
- Keep it away from heavy books or tools
- Handle with care to avoid dropping or bending
Proper Storage Methods
Store your ruler where it stays flat and safe. Good storage protects it from damage and dirt.
Use a drawer, box, or a special holder to keep the ruler straight and clean.
- Place the ruler flat in a desk drawer
- Use a pencil case or ruler holder for small rulers
- Avoid stacking heavy items on top of the ruler
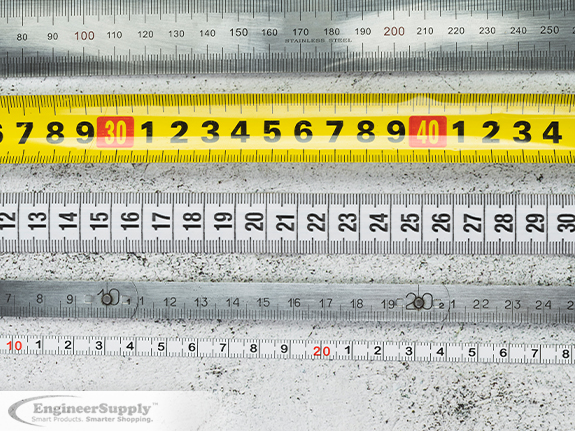
Credit: www.engineersupply.com
Frequently Asked Questions
How Do I Align A Ruler For Precise Measurements?
To measure accurately, place the ruler’s zero mark exactly at the object’s start point. Keep the ruler flat and steady. Avoid starting measurements from the ruler’s edge as it may be worn or uneven.
What Units Are Commonly Found On A Ruler?
Rulers usually show both inches and centimeters. Inches are divided into fractions, while centimeters are split into millimeters. Knowing which unit to use depends on your project’s requirements and location.
How Can I Avoid Parallax Errors With A Ruler?
View the ruler directly from above at eye level. Avoid looking at an angle, which causes misreading. This method ensures your measurement is accurate and reliable every time.
What Is The Best Ruler Type For Accurate Measuring?
A metal ruler is best for precision because it doesn’t bend easily. Plastic rulers can warp, leading to errors. Choose a ruler with clear, fine markings for the most accurate results.
Conclusion
Using a ruler correctly helps you get precise measurements every time. Start by aligning the object with the ruler’s zero mark. Read the numbers carefully and note the measurement in a straight line. Practice often to improve your skills. Accurate measuring saves time and reduces errors in projects.
Keep your ruler clean and store it safely for long use. With patience and care, measuring becomes easy and reliable. Simple steps lead to better results. Try measuring different items and watch your confidence grow.