Wiring a light switch might seem simple, but one wrong move can put your safety at risk. If you want to do it right without calling an electrician, you need clear, step-by-step guidance you can trust.
You’ll learn exactly how to wire a light switch safely, avoiding common mistakes that could cause shocks or electrical fires. Keep reading, and you’ll gain the confidence to handle this task with ease and protect your home and loved ones.
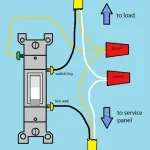
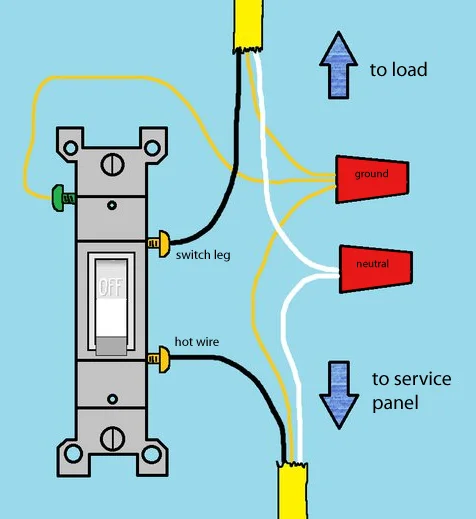
Credit: www.doityourself.com
Tools And Materials Needed
Wiring a light switch safely requires the right tools and materials. Using proper equipment helps avoid accidents and ensures a good connection.
Before starting, gather everything you need. This guide covers essential tools, required materials, and safety gear to keep you protected.
Essential Tools
Having the correct tools makes wiring easier and safer. Each tool serves a specific purpose in the process.
- Voltage tester to check for live wires
- Wire stripper to remove insulation
- Screwdrivers (flathead and Phillips) for screws
- Needle-nose pliers to bend wires
- Utility knife for cutting insulation
- Electrical tape to secure wire connections
- Wire nuts for joining wires safely
Required Materials
Materials vary depending on the switch type and wiring setup. Use quality items to ensure durability and safety.
| Material | Purpose |
|---|---|
| Single-pole light switch | Controls the light fixture |
| Electrical wires (14 or 12 gauge) | Carry electric current |
| Wire connectors (wire nuts) | Join wires securely |
| Electrical box | Houses the switch safely |
| Switch cover plate | Protects and finishes the switch |
Safety Gear
Safety gear protects you from shocks and injuries. Always wear the right equipment before starting electrical work.
- Insulated gloves to prevent electric shock
- Safety goggles to protect eyes from debris
- Rubber-soled shoes to reduce shock risk
- Dust mask if working in dusty areas

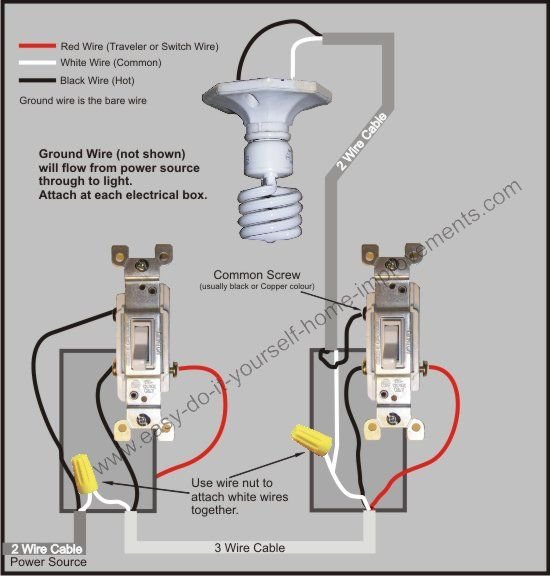
Credit: diy.stackexchange.com
Preparing For Wiring
Wiring a light switch needs careful preparation. Safety is the top priority before starting any work.
Follow clear steps to avoid accidents and ensure the switch works correctly.
Turn Off Power
Always turn off the power at the main circuit breaker. This stops electricity from flowing to the switch.
Confirm no power is running by checking other devices on the same circuit.
- Locate the main breaker panel
- Find the breaker for the switch circuit
- Flip the breaker to the OFF position
- Use a flashlight if the room goes dark
Test For Live Wires
Use a voltage tester to check wires before touching them. This confirms power is off.
| Tool | Purpose | How to Use |
|---|---|---|
| Non-contact voltage tester | Detects live wires without touching | Hold near wires; light or beep means power is on |
| Multimeter | Measures voltage directly | Set to voltage mode; touch probes to wires |
Remove Old Switch
Take out the old switch carefully. This prepares the box for the new wiring.
Follow these safety tips:
- Wear insulated gloves to protect from shocks.
- Use a screwdriver to remove the switch cover plate.
- Unscrew the switch from the electrical box slowly.
- Pull the switch out gently without yanking wires.
- Note the wire connections or take a photo for reference.
Identifying Wire Types
Knowing the different wire types helps you wire a light switch safely. Each wire has a special role in your home’s electrical system.
Understanding these wires reduces the risk of electrical shocks or damage. Let’s look at the three main wire types.
Live Wire
The live wire carries electricity from the power source to the switch or appliance. It is also called the “hot” wire.
- Usually covered with black or red insulation
- Always handle with care because it is dangerous
- Connects to the switch’s terminal
Neutral Wire
The neutral wire completes the electrical circuit by returning current to the power source. It balances the flow of electricity.
| Feature | Description |
| Color | Usually white or gray insulation |
| Function | Returns current to the source |
| Safety | Less dangerous than live wire but still handle carefully |
Ground Wire
The ground wire protects you by sending electricity safely into the earth if there is a fault.
- Usually bare copper or green insulated
- Does not carry current during normal use
- Prevents electric shocks by grounding the system
Wiring The Light Switch
Wiring a light switch needs care and attention to safety. You must connect wires correctly to avoid hazards.
Before starting, always turn off the power at the circuit breaker. Use a tester to check no electricity flows.
Connecting Live Wire
The live wire carries electricity from the power source to the switch. Usually, it is black or red.
Follow these steps to connect the live wire safely:
- Strip about ¾ inch of insulation from the wire end.
- Attach the wire to the switch’s live terminal screw.
- Tighten the screw firmly to avoid loose connections.
- Make sure no bare wire is exposed beyond the terminal.
- Double-check the wire is secure and will not pull out.
Attaching Neutral Wire
The neutral wire completes the circuit by carrying electricity back. It is usually white.
Many light switches do not connect the neutral wire. But smart switches may need it.
| Neutral Wire Type | Connection Needed? | Notes |
|---|---|---|
| Standard Switch | No | Neutral wire stays in the box, not connected to switch |
| Smart Switch | Yes | Connect neutral wire to switch neutral terminal |
Securing Ground Wire
The ground wire protects from electric shocks. It is usually green or bare copper.
Follow these points to secure the ground wire properly:
- Strip about ¾ inch of the ground wire.
- Connect it to the green ground screw on the switch.
- If no ground screw exists, attach it to the metal electrical box.
- Make sure the connection is tight and stable.
- Do not skip grounding. It ensures safety in case of faults.
Mounting The Switch
Mounting a light switch correctly is important for safety and function. This step comes after wiring the switch.
Follow these simple instructions to fit the switch into the box and secure it.
Fitting Into Electrical Box
Place the wired switch gently into the electrical box. Make sure wires are not pinched or twisted.
Push the switch back so the screw holes line up with the box holes.
- Keep wires neat and away from the screw holes
- Do not force the switch into a too-small box
- Check that the switch sits flat against the wall
Screwing The Switch
Use the screws that came with the switch. Insert them into the holes on the switch.
Tighten the screws evenly until the switch is secure. Do not over-tighten or crack the switch.
- Start screws by hand to avoid cross-threading
- Use a screwdriver that fits the screw head
- Stop tightening when the switch does not move
Replacing The Cover Plate
Put the cover plate over the switch. Align it with the screw holes on the switch.
Screw the cover plate in place. Tighten the screws gently to avoid cracking the plate.
- Use a flat or Phillips screwdriver as needed
- Keep screws snug but do not force them
- Check that the cover plate sits flush with the wall
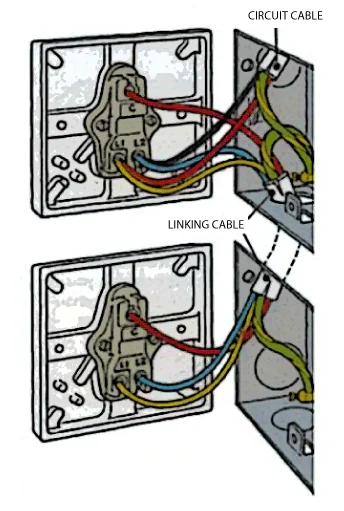
Credit: serviceteam.co.uk
Testing The Installation
After wiring a light switch, it is important to test the installation. This ensures everything works safely and correctly.
Testing helps prevent electrical problems and keeps your home safe from hazards.
Restoring Power
First, restore power to the circuit by turning the breaker back on. Make sure no tools or wires are touching the switch.
It is best to stand clear of the switch when restoring power to avoid shocks.
Checking Functionality
Test the switch by turning it on and off several times. The light should respond immediately each time.
- Turn the switch on and check if the light turns on.
- Turn the switch off and verify the light goes off.
- Listen for any buzzing or unusual sounds from the switch.
- Feel the switch for any heat or burning smell.
Troubleshooting Common Issues
| Issue | Possible Cause | Solution |
| Light does not turn on | Loose wiring or no power | Check wiring connections and breaker |
| Switch feels hot | Overloaded circuit or bad switch | Replace switch or reduce load |
| Buzzing sound | Faulty switch or poor connection | Tighten connections or replace switch |
| Light flickers | Loose wiring or bad bulb | Secure wires or change bulb |
Safety Tips And Best Practices
Wiring a light switch safely is important to avoid accidents and damage. Follow safety tips to protect yourself and your home.
This guide covers key safety areas: avoiding electrical hazards, using proper tools, and knowing when to call a professional.
Avoiding Electrical Hazards
Electrical hazards can cause shocks or fires. Always take precautions before starting any wiring work.
- Turn off the power at the circuit breaker before working.
- Use a voltage tester to ensure no current flows.
- Keep your hands dry and avoid standing on wet surfaces.
- Do not touch exposed wires or terminals.
- Replace any damaged wires or switches immediately.
Using Proper Tools
Using the right tools helps you work safely and finish the job correctly. Poor tools can cause mistakes or injuries.
| Tool | Use | Safety Tip |
| Voltage Tester | Check power is off | Test before touching wires |
| Wire Strippers | Remove insulation | Use correct size for wire |
| Screwdriver | Secure switch screws | Use insulated handle |
| Needle-nose Pliers | Bend and hold wires | Avoid slipping on wires |
| Electrical Tape | Insulate wire connections | Wrap tightly without gaps |
When To Call A Professional
Some jobs need expert help to stay safe. Know when to stop and ask a licensed electrician.
- If you are unsure about wiring or codes.
- If your home has old or faulty wiring.
- If you find damaged or burned wires.
- If the circuit breaker trips often.
- If the job requires new circuits or panel work.
Frequently Asked Questions
How Do I Wire A Light Switch Safely?
Turn off power at the circuit breaker first. Use a voltage tester to confirm no electricity. Follow wiring diagrams exactly. Connect wires securely and use insulated tools. Always ground the switch and avoid over-tightening screws.
What Tools Are Needed To Wire A Light Switch?
You need a screwdriver, wire stripper, voltage tester, and electrical tape. Pliers and a wire nut set are also useful. These tools help ensure safe and accurate wiring of your light switch.
Can I Wire A Light Switch Without Electrical Experience?
It’s possible but not recommended. Incorrect wiring risks electric shock or fire. Hiring a licensed electrician ensures safety and code compliance. Always follow safety guidelines if attempting DIY.
What Wire Colors Are Used For Light Switches?
Typically, black or red wires are hot (live). White wires are neutral, and green or bare copper is ground. Correctly identifying wire colors prevents wiring errors and hazards.
Conclusion
Wiring a light switch safely is crucial. Follow the steps carefully. Always prioritize safety. Turn off the power source. Use the right tools. Double-check your connections. Test the switch before closing the box. Seek help if unsure. Proper wiring ensures a safe home.
Mistakes can be dangerous. Stay informed and cautious. Practice makes perfect. With patience, anyone can do it. Remember, safety first always. Follow guidelines for a successful outcome. Keep learning and improving your skills.